Tuesday, 28 August 2012

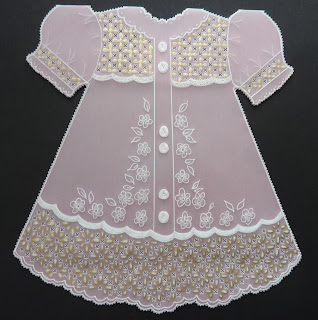
Parchment Dress

I really loved making this parchment dress.  It is a lovely card for a new born baby girl. Again this card is mainly whitework with Gold Tinta although I did colour the parchment paper with Pergamano Dorso to create the pink color. 

I coloured the paper first and folded in half and then traced the pattern with White Tina Ink on the front and then with Gold Tinta ink.  I then pierced for cutting apart from around the outside of the card.  From the back I then embossed all the white work.  I then pierced holes in the buttons to make them more realistic.

I stippled the yoke of the dress to give more texture and then I then cut the crosses in the pattern.  Finally I pierced around the shape of the card leaving the top of the shoulders neck and then cut away to leave the shape of the dress.
Wednesday, 15 August 2012

Tag Cards with Rialto Bridge

This card is one that I made from Jayne Nestorenko's 01 July workshop.  We were given the Teal and Duck Egg card and just had to cut it to size and make our tags. 

The image, which is Rialto Bridge from Jayne's Just my Imagination Grande Journeys stamp range, on the blue card is actually coloured by Jayne and was supplied originally to show the colours that we could use and also as a test piece for cutting out our tags. The problem was that most of us run out of time to colour this image and ended up using Jayne's image so that we could at least cut out the tags to take home. 

I ended up purchasing a set of the spellbinders that we used so that I could make more as I really liked the way that the card looked. 

Once I had made up the one with the material that Jayne supplied I decided that I would make another but this time in a different colourway and also that I would use an image that I had coloured. I used Core'dinations Gemstones paper for my coloured cardstock with a textured white background. I coloured the card using Spectrum Noir Pens but need to work on my clouds.

Once I had assembled, I sprayed the card with Spray and Sparkle Iridescent Glitter Varnish by Crafter's Companion.  The greeting was made using Spellbinders Label 12 with a faux nestie behind. 

Although I decided to stick to the Rialto bridge as I felt that it did lend itself to this technique, I will definitely be using this technique to make more cards using different images.

Saturday, 4 August 2012

Parchment Geisha

After making the Fan card at Jayne Nestorenko's workshop, I thought that I would make a similiar card but in Parchment.  I am not sure whether I like it that much or not but think it is growing on me.  I used the Glitter Girls Elegance and Fantasy Embossing Board to make the fan shape first our of black card.  I then used the boarfd to create a fan in parchment paper and embossed the lines more heavily to make them stand out.  Then I embossed a pattern at the top of each section of the fan. 

Using an Easy grid I perforated the pattern in each section of the fan by perforating a block of 4 holes then leaving a block of 4, alternating on each row.  In the blank row, I embossed a small circle and then cut a cross in each of the perforated blocks to create the overall pattern. 

Close Up of Cut work

I then stamped the Geisha image onto parchment paper using a white ink and then embossed from behind.  I decided against any colour as I just wanted this to be monotone.  I Geisha image using Spellbinder Labels 2 and then embossed around the edge of the label.   I then cut out a larger Labels 2 in black card and mounted the image onto that.  I used pearls in the corners to prevent the adhesive from showing through and then added the pearls to the black card for effect.  I stuck the parchment card onto the black card and then added the image topper to the fan to finish.

This card was also show by Jayne on Create and Craft when she launched her stamps.