Showing posts with label Pergamano Dorso. Show all posts

Monday, 16 December 2013

Parchment Envelope Card

Although this card looks like an envelope, it is in fact a card.  It was made for a wedding card as usually these are rarely stood up. 

I traced the pattern onto plain parchment paper and then embossed the outer edge of the back of the card and also the dots in the pattern on the front.  I also lightly embossed the pattern of the outside front border. 

Then using Gold tinta ink, I drew around the dots and also filled in the pattern of the outside front border and the ring joining the two halves of the pattern. 

Using a grid I perforated where I had filled the pattern in with Gold tinta ink. and also the crosses on the pattern. I also perforated the shape of the card. I then stippled  the border on the front of the card.  Using a star tool, I embossed on the front of the card.

I then cut out the cross and also around the borders to create the shape of the card.  I then coloured the reverse of the parchment paper with Dorso to give the shade of pink that I wanted. 

To finish, I attached a piece of pearlescent paper to the inside slightly smaller than the border.


Tuesday, 17 September 2013

Parchment and Peeloffs


This was a quick and easy card to make using parchment and peel offs.  It is an ideal card to make if you do not have a lot of time as it is one of the quickest parchment cards.

I used a large silver peel-off  which I put in each corner of the card and then coloured behind each flower using Dorso crayons.  I then added texture to the flowers by lightly embossing from behind using very light strokes.
 
I then embossed each patterned square on the border and on the solid sqaures pierced using a grid behind.
 
I then cut away the parchment paper from the large flowers and put a pearlescent paper in as an insert.
 
To make this card even quicker, I could have left out the cutaway.

Saturday, 17 August 2013

Blue Square


This is a quick parchment card to make but does not look like it.  I first drew the octagon onto the parchment paper with gold tinta ink and then using a two hole tool went around the outside and then the inside of the border and then cut the outside of the border to form the card shape. 
Then on a square piece of parchment, drew the border and cross hatch and then coloured the parchment using Dorso crayon.  I went around the outside of the card with a semi circle tool and cut away and then embossed a small dot in each semi circle of the border.  Using a grid, I perforated using each hole on every other square to form a pattern.
I drew two flower petals with gold tinta ink and on the bottom one, again using the grid pierced the parchment and on the second one I stippled the petals.  This is done by first lightly embossing the petal and then with a one hole tool, lightly stabbing to form a frosted pattern.  I then cut these out using a two hole tool and added some ribbon and layered my pieces.
I then put an insert into the card that was slightly bigger and cut around with decorative scissors to finish.

Friday, 7 June 2013

Dandelions and Ivy

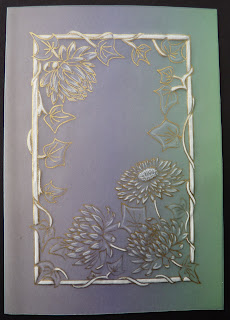
This card has no cutwork on at all but it just whitework, tinta and dorso.  This card is very quick to make as the embossing takes the longest and there is not too much of that on this card.  The colouring and tracing are very quick.

Before tracing and embossing, I coloured from the reverse of the card using Dorso crayons to create the two tone effect background.  This needs to be done first to ensure that the colour does not come through onto your whitework.

The pattern was traced out in Gold tinta ink and the embossed from the reverse.  Apart from ensuring that the border was really white, the whitework is only light on the petals and leaves.

Wednesday, 15 May 2013

A is for ...

I like the idea of monogram cards as I think that they really personalise the card.  I made this one just really starting with the first letter of the alphabet and that I also have friends with this initial.    Again, it is a really quick card to make with very little whitework or cutouts.This is one of the quicker parchment cards to make.

This was traced with gold ink and coloured with dorso crayons behind the monogram and Perga Color Exclusive for the pattern and between the patterns on the edging.  The colouring was put on the reverse side of the parchment paper and also the embossing of the edging. 

Then, using a two hole tool, I pierced around the edging of the card - except for the spine - and cut the excess away to form the edging.


Wednesday, 8 May 2013

Blue Flowers

I really enjoyed making this card as it is mainly whitework with a little colouring just to give it that hint of colour. Although it is quite a simple card, it does take a little longer to ensure that the whitework is correct.  I find that you need patience to ensure that you do the whitework correctly as if you rush, you can end up spoiling your work.

The flower pattern was first traced with a very fine line using white tinta ink. It is important that the line is extremely fine so that it does not deflect from the finished work.

I first coloured the reverse of the flowers with a blue dorso crayon and then embossed from the reverse which ensured that the whitework stayed white.
 
I then drew the outside border in gold tinta ink and then embossed between the pattern and with a two hole tool, pierced around the outside border and then cut away to finish the card. 


Wednesday, 6 February 2013

Parchment Heart Card

This card has very little whitework or cutwork on, but is mainly painting. 

The back of the parchment between the edge and the inside heart has been coloured using Pergamano Dorso Pastels

The pattern was first traced with gold tinta ink and then traced the leaves with green tinta ink.  I then coloured the background with the Dorso Pastel.

I perforated the parchment paper with a 4 needle tool and I embossed in the middle of the perforated pattern, in the leaves  and also between the gold pattern.  Next I cut the crosses in the pattern.
 
I then painted the flowers using two colours of Pintura paint on the paintbrush and then added a centre to each flower and then highlighted each petal with blue Pintura Paint.
 
I then folded the parchment paper and with a two hole tool perforated around the outside of the pattern through the two layers and then cut out the shape to finish the card.


Tuesday, 28 August 2012

Parchment Dress

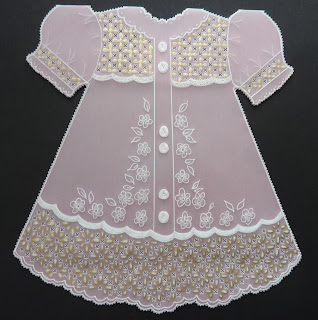
I really loved making this parchment dress.  It is a lovely card for a new born baby girl. Again this card is mainly whitework with Gold Tinta although I did colour the parchment paper with Pergamano Dorso to create the pink color. 

I coloured the paper first and folded in half and then traced the pattern with White Tina Ink on the front and then with Gold Tinta ink.  I then pierced for cutting apart from around the outside of the card.  From the back I then embossed all the white work.  I then pierced holes in the buttons to make them more realistic.

I stippled the yoke of the dress to give more texture and then I then cut the crosses in the pattern.  Finally I pierced around the shape of the card leaving the top of the shoulders neck and then cut away to leave the shape of the dress.

Tuesday, 29 May 2012

Pink and Blue Parchment

I really liked the way the colours showed through on this card.  This combines the techniques that I like as it includes dorsing, gridwork and cutwork.  It is acutally quite an easy card as there is not much work involved to get the effect. 

The pattern was first pierced using a straight grid.  This ensures uniformity of the pattern which would be extremely hard to achieve using just four hole tools. 

Once the pattern had been pierced, I then coloured the back of the parchment alternating between  Pink and blue Pergamano Dorsa colours.  

I then embossed around the pattern and the straight lines from the box and flower pattern. I embossed a circle at the end of each line from the box pattern using the Star tool and a solid circle at the end of each line from the flower.

Then I cut the crosses in the centre of the box of the pattern and the centre of the flowers with scissors and then cut the long slots and the top, bottom and sides of the box patterns.

I used a piece of pink card as an insert and cut around the edge of the card with shaped scissors to finish.

I have shown a close up of part of the card to show the cutwork in more detail. 


Thursday, 16 February 2012

Babies Booties

I thought that it was about time I posted some of my work in parchment paper.  It is a craft that I really enjoy and the finished work can be stunning and you do not see it quite so much.  It is also great to make something different than card sometimes.

The booties that I have here are on parchment paper that has been coloured  with Pergamano Dorso colours.

I belieive the pattern was taken from a book but as I got the pattern some years ago, I am not too sure.  

It is quite quick to make - for parchment craft. There are only two pieces to the pattern and one of these - the sole of the bootie - has very little work on it.

I first colour the parchment paper with the colour I want and then with white ink draw the outline of the bootie and the sole of the bootie.  I then draw the flowers on in Tinta ink in a contrasting colour and emboss the flowers.  In white ink, I draw the stitch line around the bottom of the sole and the edge of the top and strap of the bootie.  I then pierce the parchment using a grid.  Once all that is done, I cut out the bootie and then glue the two pieces together, shaping the bootie.

It is a lovely gift to present to someone on the birth of their child. To personalise it, I make an inside to fit the bootie and then emboss the name, weight and date of birth on it and stick it inside the bootie.