Showing posts with label Parchment Paper. Show all posts

Sunday, 18 May 2014

Out the kitchen Window

This is little smaller card than I usually make but I just loved the pattern.  This was from an old copy of a Parchment Craft Magazine.
 
I traced the pattern by using a stylus and then went over the border with Tinta Ink using green and yellow.
 
I inked around the edge of the card, teapot and cup with silver ink and then embossed the frame, curtains, teapot, card, mug, the petals of the border flowers and the border.
 
I painted the leaves of the border with Tinta Ink and the flowerpot and plant.  I also used ink for the decorations on the card, teapot and mug.
 
I then used a blue dorso crayon to colour the clouds and then mounted onto some blue card.  Using a two hole tool, I went around the edge of the card and then cut to finish.

Wednesday, 6 February 2013

Parchment Heart Card

This card has very little whitework or cutwork on, but is mainly painting. 

The back of the parchment between the edge and the inside heart has been coloured using Pergamano Dorso Pastels

The pattern was first traced with gold tinta ink and then traced the leaves with green tinta ink.  I then coloured the background with the Dorso Pastel.

I perforated the parchment paper with a 4 needle tool and I embossed in the middle of the perforated pattern, in the leaves  and also between the gold pattern.  Next I cut the crosses in the pattern.
 
I then painted the flowers using two colours of Pintura paint on the paintbrush and then added a centre to each flower and then highlighted each petal with blue Pintura Paint.
 
I then folded the parchment paper and with a two hole tool perforated around the outside of the pattern through the two layers and then cut out the shape to finish the card.


Sunday, 2 December 2012

Christmas Candles

I made this card some years ago as my christmas card for friends and family and I thought that I would make another couple this year as it is nice and quick to make.  It is a really nice simple card with very little work.  The candle has some cutwork on and the rest is just whitework. 

I have used mirri card as the insert as the relfection of the candle against it is a nice effect.  I attached the parchment to the insert with a thick metallic thread and trimmed the parchment with decorative scissors.

Wednesday, 28 November 2012

Christmas Lampshade

As it is that time of the year, I thought I would show something different that a card.  This lampshade can be put on your Christmas table to decorate it.  Although you can use a real tealight, it would be better to use one of the artificial lights that you can now buy.

If you do use a real tealight, ensure that there is enough clearance at the top and sides to enure that your lampshade does not catch fire This needs to be done on a heavyweight parchment and is very quick to make as there is no whitework or cutwork. 

The holly leaves and berries outline was first drawn in Tinta ink. I used the perforating semi circle tool the create the border and then cut between the perforations to get the finished shape.  I then went around the border with gold Tinta ink.

The berries and holly leaves were painted with Pintura paint and then embossed from behind to add depth.   I then drew some poinsettia flowers onto red parchment paper and cut them out.  I embossed from behind to take out some of the colour and also to shape the petals and glued these onto the shade and heavily embossed the centre. I then added a few gold beads to the centre of the flower leaving the heavily embossed part to form part of the centre.  I then used some double sided tape to attach both sides to form the shape.  As it is a heavier parchment, the tape does not show quite as much.

Monday, 12 March 2012

Parchment Box

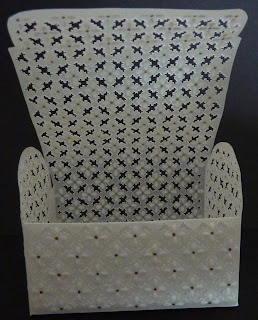
This is one of my favourite parchment pieces as I really enjoy whitework and cutting, although it can take a long time to complete.  It is an arched box and would be lovely to present to someone with sweets or little items in.  It might be nice to give wedding favours in but I would not want to spend that much time making the amount that would be required. 

Although I do use patterns out of magazines and books and sometimes use a grid for piercing, I do not use the grids where the patterns are on them as to me that takes the fun out of the craft.

It is 7cm x 5cm x 5.5cm and the top flap fit inside to enable you to close the lid.

It is all made from one piece of parchment paper and you do need to make sure that use a good parchment paper (I use at least 150gsm started with this brand and it is of a good quality but there are others on the market.  Sometimes other brands can be a little too flimsy for items like this.

I first drew the pattern out on the parchment paper with white ink and a nib and then drew the flower petals onto the parchment paper with the same ink and nib. 
 
I then half pierced the parchment paper between the petals where I was going to later cut it.

I then embossed the flower petals and in the centre of each petal, with gold ink made a small dot. 

I went back after this and fully pierced the parchment paper and once I had completed that, I  cut out the pattern between each petal with scissors.  Cutting out with parchment involves holdong the scissors so that they actually cut an X in the paper after 4 cuts.  It is quite time consuming but does look very effective if done right. 

It is just a shame that my photography skills are not that good.