Tuesday, 29 May 2012

Pink and Blue Parchment

I really liked the way the colours showed through on this card.  This combines the techniques that I like as it includes dorsing, gridwork and cutwork.  It is acutally quite an easy card as there is not much work involved to get the effect. 

The pattern was first pierced using a straight grid.  This ensures uniformity of the pattern which would be extremely hard to achieve using just four hole tools. 

Once the pattern had been pierced, I then coloured the back of the parchment alternating between  Pink and blue Pergamano Dorsa colours.  

I then embossed around the pattern and the straight lines from the box and flower pattern. I embossed a circle at the end of each line from the box pattern using the Star tool and a solid circle at the end of each line from the flower.

Then I cut the crosses in the centre of the box of the pattern and the centre of the flowers with scissors and then cut the long slots and the top, bottom and sides of the box patterns.

I used a piece of pink card as an insert and cut around the edge of the card with shaped scissors to finish.

I have shown a close up of part of the card to show the cutwork in more detail. 


Friday, 11 May 2012

A Quick Card

I needed to make a card for a birthday quickly so decided that I would use a Stampavie image and used Sarah Kay's Juliet in the field of nasturtiums and coloured it with Copic sketch pens.  I really like this image and it is quick to colour in.

After colouring, the image was cut out using Spellbinders Lacy Ovals. This was mounted onto another Spellbinders oval die cut.  The backing paper was one that I had in my stash but I cannot remember what is was.  The edge was made with Martha Stewart Floral Band Double Edge Punch.

The flowers were from Wild Orchid Crafts.  I wrapped a ribbon around the background card and fastened with a bow. 

The greeting was a peel off and again a Spellbinder die was used to cut the tag to put the peeloff on.   

Tuesday, 1 May 2012

Butterfly Parchment Card

This is another parchment card but has very little whitework this time.  It is an easy card to make parchment wise but is effective.

I first drew the pattern of the butterflies in white tinta ink and then drew the flower pattern in gold ink and the edging at the bottom of the card.

I then embossed the inside of the petals and also the grid lines on the card. 

The next step was to pierce the centre of the flower with a one hole piercing tool and then to pierce around the bottom edge of the card.  Once I had completed the piercing at the bottom of the card, I then cut this out to finish the bottom edge.

The butterflies were then coloured in using PCE's (Perga Color Exclusive) and the antennaes where drawn on with tinta ink to finish. 

Sunday, 15 April 2012

Patchwork Card #2

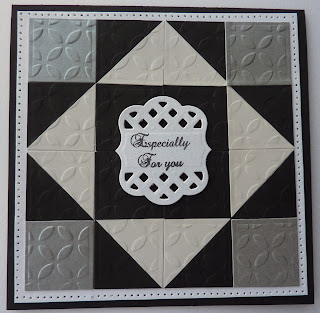
I enjoyed making my first patchwork card so much that I thought that I would continue with that theme but use a different size, pattern and colourway to complete this card.  I thought that this would be an ideal card for a male in these colours.

I have used the pattern King of Crowns for this and used black, dark grey and light grey to make it.  This was a four-patch patchwork block.  I first embossed the paper using  Patchwork M-bossabilities and then with a square spellbinder, cut out the amount of blocks that I needed. 

I then cut the blocks - apart from the four centre blocks and the four corner blocks - diagonally. 

This was then attached to some white card and then I pierced around the edge of the card using the Tim Holz ruler. 

I stamped an greeting on some white card and using one of the Spellbinders Lattice motif dies, cut it out and mounted it onto the centre of the card.

This was then matted onto black card to finish.

Sunday, 1 April 2012

White and Gold Parchment

This is a fairly easy parchment card to make with just whitework and gold tinta and can be made very quickly. You do not need much in the way of tools to complete this card - just a nib, white and gold tinta ink and an embossing tool. It is also a good card to practice white work on but to get something at the end that you can use.

I first drew the pattern onto the parchment paper on the front of the paper with white tinta ink and a nib.  You could do this with a white pencil instead but I prefer the ink method.  Then on the reverse side I embossed the pattern.  If you use ink, never embossed on the same side as the ink as you will get grey marks on your embossing that you will not be able to turn white and will ruin the look of your work. 

Once all the white work was complete, I went over the flourishes with tinta gold ink.

I drew a border in gold about a centimetre inside the outside edge of the card and then finally I embossed a white border on the outside edge of the card to finish.


Thursday, 22 March 2012

Patchwork Card #1

I noticed that Sue Wilson had created a card showing the new Spellbinders using both the new dies and also the M-bossabilities that was a patchwork design.  This got my juices flowing as I love patchwork but do not usually get time to do any at the moment.  I will work on my material stash again one day but it is easier to make smaller items than larger ones at the moment. 

When I saw Sue's card, it gave me the idea that I could still feed my love of patchwork with the quickness of card making and started looking through all my pattern books for patterns that could be converted into cards.  I also felt that using a patchwork pattern would work for either male or female depending on the colours used.  It was oonly then I realised just how many different patterns I could come up with that would convert well to cards.

I decided that I would make a few cards in different sizes, patterns and colourways and the first one was the nine patch pattern - Cards.    I used a light blue, cream and snowhite pearlised card and embossed them with Simplicity for the cream, Patchwork for the light blue and Imperial for the white card.

After embossing, I cut out 3 squares with a spellbinders in each colour and the halved them all.  I then cut 2 of each colour in half again and then placed them in the correct order on matt silver background and then matted onto the light blue and then white and then onto a cream card.

To finish, I printed the four symbols of playing card and the words 'Happy Birthday' and then used Epiphany Shape Studio to punch them out and put an epoxy shape on top of the signs and words.  As I only have square epoxy shapes, I put the words on the diagonal to match the cards. 

Monday, 12 March 2012

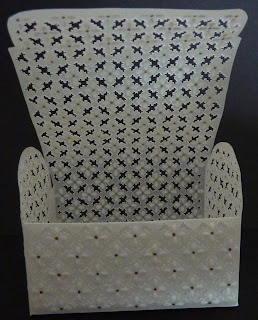
Parchment Box

This is one of my favourite parchment pieces as I really enjoy whitework and cutting, although it can take a long time to complete.  It is an arched box and would be lovely to present to someone with sweets or little items in.  It might be nice to give wedding favours in but I would not want to spend that much time making the amount that would be required. 

Although I do use patterns out of magazines and books and sometimes use a grid for piercing, I do not use the grids where the patterns are on them as to me that takes the fun out of the craft.

It is 7cm x 5cm x 5.5cm and the top flap fit inside to enable you to close the lid.

It is all made from one piece of parchment paper and you do need to make sure that use a good parchment paper (I use at least 150gsm started with this brand and it is of a good quality but there are others on the market.  Sometimes other brands can be a little too flimsy for items like this.

I first drew the pattern out on the parchment paper with white ink and a nib and then drew the flower petals onto the parchment paper with the same ink and nib. 
 
I then half pierced the parchment paper between the petals where I was going to later cut it.

I then embossed the flower petals and in the centre of each petal, with gold ink made a small dot. 

I went back after this and fully pierced the parchment paper and once I had completed that, I  cut out the pattern between each petal with scissors.  Cutting out with parchment involves holdong the scissors so that they actually cut an X in the paper after 4 cuts.  It is quite time consuming but does look very effective if done right. 

It is just a shame that my photography skills are not that good.