Thursday, 27 December 2012

Fan Plate

This is another card from one of Jayne Nestorenko's workshops and this is a really quick and easy card.  The white background was cut out of Centura Pearl Card with a Spellbinders Grand Calibur Scalloped Circles die, then a circle to fit inside was cut out in Core'dinations using the Spellbinders Grand Calibur Circles and finally in Centura Pearl another circle using Spellbinders Lacey Circles. 

Using Jayne's Grande Journeys Accessories stamp, I stamped 3 fans and then coloured them exactly the same using Copic pens.  I then cut out these three fans and mounted them onto a small square piece of card so that they formed a circle.  The piece of card at the back gave a little bit of stability to be able to put the brad on a little later. Try as I might, I could not match them up exactly as I wanted as one side is definately high than the other!  Once I was happy as I coud be, I then put a brad in the middle of the fans and pushed this through.  I then mounted this onto the Lacey Circle card and then mounted that onto the circle and then the scalloped circle. 

This was then put on a stand that was created with Centura Pearl and Joy Crafts Card stand die.

As the brad did not go right through the card, there is room to put a nice notelet with a sentiment on the back.

As this will be my last post this year so I wish all a Happy and Prosperous New Year. 

Tuesday, 25 December 2012

Happy Christmas

Schwarzenberg Market
Hope you all have had a great Christmas and are having a nice well deserved rest.  It is just a shame that the weather is so wet.

I have had a really busy Christmas period with the usual making cards for family and friends but also this year I have had quite a few requests to make cards for other people and that has taken time.  I had not planned on making cards for other people but took the opportunity that was given.


View from hotel room in Gera

I also got away for 8 days to Germany.  Both my husband and I enjoy the Christmas Markets over there and this year we decided to visit friends and drove over to the eastern part of Germany and ended up visiting the markets in Dortmund, Gera,  Schneeberg, Schwarzenberg, Jena, Leipzig, Erfurt, and Cologne.

We hit a lot of snow when travelling east and although made for some pretty Winter Wonderland scenes, did making driving difficult. It was amazing how quickly the snow ploughs cleared the roads and the only really difficult part was about 3 miles from our hotel.
Schneeberg Market
The markets are all very different although all have the usual Gluehwein stalls which never seem to be  empty.   Our friends took us into the Erzgebirge region (Ore Mountains) to a Christmas Market that was mainly woodcarving from the area. The work was really lovely and is considered the best in the area.  I must admit that we were pleased that they drove as they had a 4 wheel drive with winter tyres.  We both ended up buying better boots to keep our feet warm and dry.
Leipzig -  Advent Calendar

It really made a lovely break and if you have never been to the Christmas markets and get the change, then it really is an experience not to be missed.  The only thing I don't like is being at them on a Saturday evening as you really cannot move in them in the bigger cities.  The are full of both locals and tourists.  It is one place where locals and tourists do mix.

It was a nice break from the Christmas rush but did mean that it was then a last minute panic to get ready for Christmas but I did manage it eventually.

Cologne Cathedral Market


Wednesday, 12 December 2012

Xmas Card for 2012

Now all the cards have been sent out, it is time to show my Xmas card for this year. I must admit that I was glad to get it in the post - I start off with so much enthusiasm but after making so many the same - the enthusiasm does seem to dwindle somewhat.
 
This year I thought that I wanted to make some quick and uncomplicated cards but in the end they took just as long as last year. I just do not seem to be able to make really quick Xmas cards.


I wanted to make an easel card as this is not a card that you see for sale much in the stores and it is easy if someone wants to hang it up or it can just as easily be put on a mantelpiece or table.


The background paper is a perfumed card that has a cinnamon smell and I bought some of this from last year’s show at Ally Pally but could not remember what store I bought it from. When I came to make my cards this year I realised that I did not have enough of the background paper and after searching on the web, found that I could get it from Art of Craft Ltd.


I used Spellbinders Grand Scalloped Squares for the shape of the card and used the 6” size for my card with the 5” for my background. I used  the 3⅜ x 3⅜″ Spellbinders Classic Scalloped Squares LG for the verse insert. 

Onto my background I mounted a Holly Flourish by Cheery Lynn and then to that added a Christmas recipe card.  I had made the recipe cards from LOTV Christmas recipes set.  I had stamped the card, coloured the border with copics and then distressed the cards with Aged Paper distress ink to get them that used look.  I used a die from the Spellbinders Holly Accents at two corners of the card and added a greeting from either Cheery Lynn Happy Christmas set or Cheery Lynn Merry Christmas set.

For the stopper on the card I used the two smaller pointsettia leaves from Spellbinders Layered Poinsettia. 


Friday, 7 December 2012

Humourous Cards for the men

As it is my brother and my brother-in-law’s birthdays within a day of each other, I decided that they would get the same card this year. I had found a great verse for grumpy men that I got from Joanna Sheen’s newsletter and decided that I would make a humourous card and use that verse.


I used La Pasche’s A5 Stamps Set Flippin’ Men Peace as I thought that this would appeal to both of them and I liked the idea of having a back and front.

I coloured the front and back images using Copic Pens and then cut them out and mounted them on to acetate.

I then cut out an aperture with Spellbinders Labels 8 on an A4 card and then also cut out another one on an A5 piece of card so that I could mount on the back of the front leaf to hide where I had mounted the acetate, making sure that they matched up when put together.


I then stamped the border of toilet rolls, also from the stamp set, down the left and right hand side in Versafine Sepia and also stamped the greeting  in sepia and mounted this onto the card.

I attached the insert with the grumpy men verse to add to the humourous theme.

I am hoping that they both enjoy the humour in these cards and they are a little different to what they normally get.

Sunday, 2 December 2012

Christmas Candles

I made this card some years ago as my christmas card for friends and family and I thought that I would make another couple this year as it is nice and quick to make.  It is a really nice simple card with very little work.  The candle has some cutwork on and the rest is just whitework. 

I have used mirri card as the insert as the relfection of the candle against it is a nice effect.  I attached the parchment to the insert with a thick metallic thread and trimmed the parchment with decorative scissors.

Wednesday, 28 November 2012

Christmas Lampshade

As it is that time of the year, I thought I would show something different that a card.  This lampshade can be put on your Christmas table to decorate it.  Although you can use a real tealight, it would be better to use one of the artificial lights that you can now buy.

If you do use a real tealight, ensure that there is enough clearance at the top and sides to enure that your lampshade does not catch fire This needs to be done on a heavyweight parchment and is very quick to make as there is no whitework or cutwork. 

The holly leaves and berries outline was first drawn in Tinta ink. I used the perforating semi circle tool the create the border and then cut between the perforations to get the finished shape.  I then went around the border with gold Tinta ink.

The berries and holly leaves were painted with Pintura paint and then embossed from behind to add depth.   I then drew some poinsettia flowers onto red parchment paper and cut them out.  I embossed from behind to take out some of the colour and also to shape the petals and glued these onto the shade and heavily embossed the centre. I then added a few gold beads to the centre of the flower leaving the heavily embossed part to form part of the centre.  I then used some double sided tape to attach both sides to form the shape.  As it is a heavier parchment, the tape does not show quite as much.

Wednesday, 21 November 2012

Mr and Mrs Snowman

This is a nice light card for Christmas. There is no whitework or cutwork which makes is quicker to make. It is a card that I really like making and has a real winter feel to it.

The snow people were traced onto the parchment in white tinta ink and the snowflakes with silver tinta ink. The pattern was then pierced.

The snow people were coloured in with tinta ink and Perga Liners and the white parts were then embossed and stippled. Then they were shaded using a blue Perga liner.

The snowflakes were coloured from behind using the Perga Liners and the lines of the pattern were embossed to make them stand out more.

I then drew a double border around the top, bottom and right side of the card and just a single border on the left side of the card with silver tinta ink. I then added a shiny pale blue insert and then cut the edges of the card with decorative scissors to finish.

Tuesday, 13 November 2012

Found: One Craft Room

After some clearing out

A few weeks ago, I decided that it was about time that I reclaimed back my craft room.  For the last few years, I have just used it to store all my craft stuff but then got fed up of having to buy new card and products as I could not find the original ones that I had bought.  Things seemed to come to a head when I couldn't find an embossing folder that I wanted that I knew that I owed and ended up buying a new one.  I had been putting everything in the craft room and things were just stacking up and I didn't know what was there anymore.  Also, I was finding that I was doing everything downstairs in the living room and there was not really a table high enough and that I was getting a sore back from bending over so much . It was especially so when making my Christmas cards this year and things were not easily at hand.

overflow of stash

The photo above was after I had cleared a lot out and put elsewhere (photo right) until the room had been cleared.  I had forgotten to take a photo before I started although I am not sure that it would have shown just how much was in the craft room - no photo is that big!  It got to the stage where under the stairs was completely full, the craft room was so full that I was not able to walk in there and my stash was starting to overflow elsewhere.

I was going to wait until I had a few days holiday this month but then decided that it could not wait and there was possibly more than I would be able to do in the few days that I was going to have. It was time to be ruthless and only keep what I really needed and could not do without. I had tried a few different crafts such as silk painting and Precious Metal Clay but had not done them for a while so it was out with them.

Craft Room after being cleared
I even realised that I had four sewing machines and that I was never going to use them so two of them ended up at the tip.  I ended up taking 3 full car loads of rubbish down to the tip - and that is without all the magazines.  I did keep all my stash of material for patchwork and quilting but did get rid of any small scraps.  It was amazing to see what material I actually had and don't think I need to be buying any more for quite some time.

I had magazines on Parchment Craft, Quilting and Card Making going back to 1994 and these are also going to end up in the recycling bin but first I am scanning in all the articles and patterns that I want and keeping them electronically which will take up a lot less room.  A small 2 inch flash drive is taking up a lot less room that 6 stacks of magazines each 3ft high and that is only what if left.  It is going to take some time to go through all of the magazines extracting what I want  so I still have a stack of magazines but am getting through them.
Now organised
Some of the books that I no longer wanted I gave to my local library as they were in immaculate condition and other people will then be able to get pleasure out of them.  I was surprised that they took them but they seemed really grateful and meant that I got rid of the straight away.  Even if they don't put them on the shelves but sell them, it will given them funds to buy other books.

I was hoping to finish it a lot sooner than I did but suddenly ended up with orders from 4 people to make some Christmas cards for them and as 1 person was sending her cards overseas it meant that things had to be  put on hold for a little while although the main thing was that I had cleared the desk and so was able to utilise that for my embossing and glittering. 

I still have a little more to do but everything from the craft room and under the stairs has been put it its place and I know where everything is and can even get to it.  I will now be able to do more crafting and as can be seen from the photos above - a lot better than before. 

Now to keep it like it!!

Wednesday, 31 October 2012

A Card for my Husband

This time I managed to make a card a few weeks before his birthday - I was not going to have the last minute panic that I had the previous year so started looking around for ideas early.

I do find it hard to pick different topics each year but when I saw this topper of a map, old car and motel sign in a shield, it reminded me of our holiday stay in Holbrook, Arizona this year along Route 66.  We had stayed in a motel along the old Route 66 and my husband loved it, especially as there were a few murals on the walls of nearby building of the Route 66.  As soon as I saw it, I knew that it was right for him and it would be great as an easel card which he likes.

For the shape of the card, I used Spellbinders Grand Nestabilities Large Labels.
The topper is from HOTP 3-D Papier Tole 8026 Vintage Journeys Die-Cut Paper Decoupage and the background papers are from HOTP Chocolate Paper Pack.  I stamped the greeting on the topper using the greeting from Paintbox Poppets. used Centura Pearl Ivory Card for the base of the easel card. 

I used the same Spellbinders and papers for the inside of the card and for the stopper I used a smaller version of the front topper that came on the same sheet and backed it with brown card.  I printed a verse on some of the Centura Pearl Ivory card and then cut it out with the smallest of the labels to complete the card.

I think that these papers make ideal cards for men and in this case hopefully bring back memories of our holiday.


Wednesday, 17 October 2012

Christmas Poinsettia

This is another card from Jayne Nestorenko's new Christmas range.  This is a beautiful stamp that can be used as either a medallion stamp or a flat stamp. 

The background lattice design was made by using a Hoogie Board and although not as quick as using an embossing folder, does mean that you can make it the size that you require and have the lattice design and small or as large as you want.

The ornament shape was made by using the largest of the Spellbinders  2011 Heirloom Ornaments.  The gold background was made by drawing round the outside of the die, the red card was made by using the die and the white was made by drawing inside the die.  Although on the workshop we cut out the white ornament and then stamped onto it, at home you could do it the other way.  The background of the stamp was coloured using Spectrum Noir pens.  I stamped the image 3 times onto red card and gold embossed.  I then cut out the images, each time with fewer petals to create the meadallion effect.  The layers were then glittered and layered  and I used gold Mica Flakes in the centre. 

The easel card was then assembled and finished off with ribbon.  I think that Jayne has really designed a wonderful stamp - especially with the foliage in the background.

Wednesday, 3 October 2012

New Stamps by Jayne

I spent a great Sunday at another of Jayne Nestorenko's workshops.  This was the Christmas workshop and was great as we were the first to use her new stamps.  It was touch and go whether this one would actually arrive in time for us to use it as it only arrived with Jayne on Friday. 

Jayne has designed a set of six new stamps that hopefully will be available next week and they are all stunning. 

This one is her Christmas Tree and it can be used for Christmas or just winter scenes.  It is a very quick card.  I first stamped the tree onto some Sparkle Card and embossed with Gold embossing powder.  I then cut around the tree  in profile but tore the bottom of the card from the stump to the edge.

I then embossed onto white card for the backround using the Winter Wonderland M-bossabilities and stamped and embossed a sentiment at the bottom.  I then added a piece of ribbon round this background and attached to my card.  I then tore  a piece of  Centura Pearl Snow white and attached this to the background and then attached my tree to the card.  I then used crystal glittler ti fill in the white spaces in the tree and also in the ground to create a snow effect.

Wednesday, 26 September 2012

Spectrum Noir Colourist Accreditation

Well, last week I was very pleased that  to hear that I had now got my Spectrum Noir Colourist Accreditation and can proudly display a blinkie to this effect.  I am just waiting for my name to appear on the list on their website and to receive my certificate.  I had first seen about this accreditation on Julie Woolston's blog - craftyjulie57.blogspot.co.uk - when she had got hers and then I received an email from Crafter's Companion. Like Julie, I didn't have that much confidence in my colouring.  The accredition is free for everyone to get and you need to download the test from their website www.spectrumnoir.com.  You then need to print it out onto the correct card or paper for alcohol pens, colour in, scan and submit to the email address provided.  There is a sample test for you to see what is expected but it is up to you what colours you use. 

 I was not convinced by the Spectrum Noir when they first came out but after sticking with them have found that I do like them and actually enjoy colouring with them.  I have enclosed two of the test colourings that I submitted - the first one is the nature landscape which I was really pleased with the way it turned out as I had not really used alcohol pens before to colour in nature.  The second one was an optional one that we could choose to submit so I chose to colour in Paintbox Poppets "Apple for Teacher" stamp as this is one of my favourites.

I am often very critical of my work so it was nice to submit it to the "experts" for their views.  What I like about the programme is that if your colouring is not quite up to scratch, they will provide feedback with suggestions on how to improve your colouring skills.  It is not often that you get that sort of service for free nowadays.  Luckily for me, I did not need it.

Wednesday, 19 September 2012

Parchment and Peel offs

This card has been made very quickly using large peel offs.  This is a good card for a beginner to practise using a grid or just to make a quick card.

I just folded a piece of A4 parchment paper in half and the chose a large peel off which I stuck onto the parchment paper in the bottom corner and attached two smaller peel offs in each of the top corners. 

Using White Tinta ink I then traced around a greeting that I had (I had previously typed this using a large font and then printed out).  From the back I then embossed the wording and the flowers of the top corner peel offs.

I then coloured the flowers of the large peel off from the front using Tinta Yellow Ink.

With an Easy Grid, I pierced each hole to form the pattern inside the peel offs of all that had not been coloured all embossed.

With a Semi Circle Perforating Tool, I then pierced a pattern from the edge of the peel offs to the edge card and cut out.  With a Two Split perforating Tool, I pierced from the edge of the card to the peel off and in between the peel offs and cut to create a nice border.


Wednesday, 5 September 2012

New Home Card

As my brother was moving, I thought that this would make a great New Home Card.  I had originally made this card on a workshop with Jayne Nestorenko at the end of July but thought that I would make it bigger and use a different sentiment.  It is really more for his partner than for him.  I had asked what her favourite colour was to ensure she received a card in colours that she liked and I know that she likes flowers.  I prefer to see flowers in the garden so thought that she would receive a card and flowers all in one here.

This card was made with Grand Labels 4 using the 3rd, 4th and 5th size dies.  On the original card with Jayne, we only used the 1st  and 2nd size dies and drew around the smallest on the outside to create a faux nestie.  As I wanted this card to be larger I did not use a faux nestie for this and used Centura Snow White and Core'dinations card.  You need to ensure that the card is firm enough to be able to take the large size. 

I stamped flowers and leaves from Jayne's Grande Journeys stamp range onto watercolour paper and then coloured them in with a variety of H2O's and Cosmic Shimmer watercolour paints.  Some of the flowers I cut and shaped and used Cosmic Shimmer Mica Flakes to create the centre. 

The sentiment is from Lili of the Valley, stamped onto Core'dinations and cut out with Spellbinders and mounted.  I made a box for the card to go into and just hope that she will like this.

I have also shown the original card I made at Jayne's workshop although this does not show the difference in size.

Tuesday, 28 August 2012

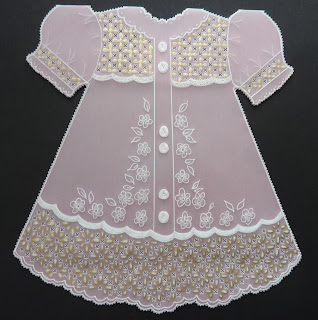
Parchment Dress

I really loved making this parchment dress.  It is a lovely card for a new born baby girl. Again this card is mainly whitework with Gold Tinta although I did colour the parchment paper with Pergamano Dorso to create the pink color. 

I coloured the paper first and folded in half and then traced the pattern with White Tina Ink on the front and then with Gold Tinta ink.  I then pierced for cutting apart from around the outside of the card.  From the back I then embossed all the white work.  I then pierced holes in the buttons to make them more realistic.

I stippled the yoke of the dress to give more texture and then I then cut the crosses in the pattern.  Finally I pierced around the shape of the card leaving the top of the shoulders neck and then cut away to leave the shape of the dress.

Wednesday, 15 August 2012

Tag Cards with Rialto Bridge

This card is one that I made from Jayne Nestorenko's 01 July workshop.  We were given the Teal and Duck Egg card and just had to cut it to size and make our tags. 

The image, which is Rialto Bridge from Jayne's Just my Imagination Grande Journeys stamp range, on the blue card is actually coloured by Jayne and was supplied originally to show the colours that we could use and also as a test piece for cutting out our tags. The problem was that most of us run out of time to colour this image and ended up using Jayne's image so that we could at least cut out the tags to take home. 

I ended up purchasing a set of the spellbinders that we used so that I could make more as I really liked the way that the card looked. 

Once I had made up the one with the material that Jayne supplied I decided that I would make another but this time in a different colourway and also that I would use an image that I had coloured. I used Core'dinations Gemstones paper for my coloured cardstock with a textured white background. I coloured the card using Spectrum Noir Pens but need to work on my clouds.

Once I had assembled, I sprayed the card with Spray and Sparkle Iridescent Glitter Varnish by Crafter's Companion.  The greeting was made using Spellbinders Label 12 with a faux nestie behind. 

Although I decided to stick to the Rialto bridge as I felt that it did lend itself to this technique, I will definitely be using this technique to make more cards using different images.

Saturday, 4 August 2012

Parchment Geisha

After making the Fan card at Jayne Nestorenko's workshop, I thought that I would make a similiar card but in Parchment.  I am not sure whether I like it that much or not but think it is growing on me.  I used the Glitter Girls Elegance and Fantasy Embossing Board to make the fan shape first our of black card.  I then used the boarfd to create a fan in parchment paper and embossed the lines more heavily to make them stand out.  Then I embossed a pattern at the top of each section of the fan. 

Using an Easy grid I perforated the pattern in each section of the fan by perforating a block of 4 holes then leaving a block of 4, alternating on each row.  In the blank row, I embossed a small circle and then cut a cross in each of the perforated blocks to create the overall pattern. 

Close Up of Cut work

I then stamped the Geisha image onto parchment paper using a white ink and then embossed from behind.  I decided against any colour as I just wanted this to be monotone.  I Geisha image using Spellbinder Labels 2 and then embossed around the edge of the label.   I then cut out a larger Labels 2 in black card and mounted the image onto that.  I used pearls in the corners to prevent the adhesive from showing through and then added the pearls to the black card for effect.  I stuck the parchment card onto the black card and then added the image topper to the fan to finish.

This card was also show by Jayne on Create and Craft when she launched her stamps.


Saturday, 28 July 2012

Workshop with Jayne

As the workshop season now seems to be here it was time for a visit to the wonderful Jayne Nesotrenko's workshop in July.  I had missed her earlier workshop due to being away on holiday in Arizona and  as I had only been back a week was still suffering a little from Jet Lag - it had hit me hard this time.

I had a really good trip seeing such wonderful sights as the Grand Canyon, Lake Powell and the Rainbow Bridge, Monument Valley and Canyon de Chelly.  I even signed up to the Michael's loyalty card and found a wonderful craft shop in Page that had gorgeous papers that I just had to bring back with me. 

Jayne's workshop was based on her new collection "Grande Journeys" from her "Just my Imagination" range and  I was bowled over by them.  Jayne had released them 3 days before I was due on the workshop and I did not really get a good chance to look at them before I went.  The samples that she had on display were superb and I had seen that we were going to make a Japanese fan card. 

The fan shape was made using the Glitter Girls Elegance & Fantasy board and we got to choose what coloured background card we wanted.  The scene in the background is Jayne's Kyoto Garden which we coloured, cut and attached to the card and Japanese  Geisha which we also coloured.  We had the choice of whether to decoupage the image or just have it as a single image.  I decided to decoupage and ended up with 4 layers. 

The flowers and fan were from "The Grande Journey Accessories" stamp plate and again were coloured and attached to the card. 

I really enjoyed making this card and the instructions to make this are on Jayne's website here http://nestorenkostamps.co.uk/project-1-geisha-fan-card/ .


Sunday, 15 July 2012

Back to School Girl

I coloured this LOTV stamp a few months ago but have only just decided to use it on a card.  The stamp is called "Back to School Girl" and just loved the expression on her face.  There is also a boy stamp which I also bought at the same time that has just as good an expression.

I used Copic pens to colour her although I did not keep a record of which colours I used but think it was the Warm Greys. This was made into an 8" x 8" card due to the size of the doily used as I felt the image fitted into this well.  I used Rainbow card to cut French Pastry Doily die.

In the corner, I used a spellbinder die to cut out the corners in the same rainbow card to match.
This was then mounted onto Core'dinations card and then onto some 7Gypsy paper that I had in my stash. 

The flowers used were from Wild Orchids Craft Sweetheart Blossoms and Cherry Blossoms.

Tuesday, 3 July 2012

Parchment Fan

This fan was a labour of love as it did take quite a time to make all fourteen ribs of the fan but it was well worth it. 

It is  white work with cutting and a little gold tinta ink to make the embossing on the ribs stand out more. 

The ribs were joined with some thin gold metallic ribbon and a tassle at the end to hold it all together.

The fan does fold in on itself but the parchment is not strong enough to enable it to be used as a fan. 

It is purely for decoration and I am going to mount it on some black card and frame it. 

This is one project that will not be finding a home elsewhere.

Tuesday, 26 June 2012

Card for my Niece

As it is shortly my niece's birthday, I thought that I would use one of the Paintbox Poppet stamps to create a card for her and used With Love.

I used Spectrum Noir pens to colour the image and after colouring cut out using the Spellbinders Floral Oval dies.  Before removing the die, I went around the inside of the oval shape with Antique Linen Distress Ink, using a cut-n-dry pen nib to get a fine line.

I used two background papers from the Papermania Capsules range and also the Martha Sterwart Doily Lace Edge punch.

The greeting was printed onto card and then cut out using the Spellbinders ovals.  I then cut out the backpiece for the greeting using one of the  smaller Floral Ovals dies and mounted the greeting on to it.

The flowers were from Wild Orchid Crafts and to finish, I made 3 pearl beads with Cosmic Shimmer Pearl PVA glue by dropping them straight onto the card and letting it dry overnight. 

Saturday, 16 June 2012

A Circle of Flowers

This card was made using  Ivory coloured parchment paper.  If you have not got coloured parchment paper, you can still achieve a coloured background by colouring your parchment paper with Pergamano Dorsos first.

Although it does not look like a card, it actually folded as a card.

I was really pleased with the way that this turned out and this is a card that I would certainly send someone special.

I first drew the pattern onto the parchment, apart from the outline of the leaves and stems with white tinta ink.  I used a nib to ensure the fineness of the line.  I then drew the outline of the leaves and the stem in sepia tinta ink.
From the reverse, I then embossed the flowers, leaves and borders. 

With the flower petal, I just used a light stroke rather then heavy embossing which gives movement to the petals.  With the centre of the flowers, I used the one hole tool to gently pierce them.

With a fine grid, I then pierced the spaces in the border pattern.  I then folded the card and pierced through the two layers around the outside of the border pattern and then cut away the excess to leave the shape of the card.

I have shown a closeup of flower and the border section.

Wednesday, 6 June 2012

Ships Aweigh Two

I was going to send the first card I made with this stamp desinged by Sam Poole and and the Couture Creations embossing folder to my cousin for his birthday but wasn't 100% sure about it.  I showed it to my mother and she said it was fine but then decided that I would make another one and change it a little

This time I made the card a little smaller to fit the embossing folder.  Once I had embossed some light blue card, using a cut-n-dry pen nib and Gathered Twigs distress ink, I coloured all the land brown.  Then using Broken China distress ink, I coloured the lines, compass and wording. 

I  then mounted some dark blue card onto a cream background and mounted the embossed card onto this. 

Then I stamped the ship using Brilliance Starlight Silver and then coloured in using the same ink with just a little purple and blue in the sea. I  cut the ship out using the Spellbinders Circles, using the Out of The Box technique for the top of the ship so that I did not cut that part off and using foam pads mounted onto the card.

Again, using the Starlight Silver, I stamped anchor, wheels and small ships around the outside of the embossed card, masking the embossed card so that it looked like the embossed card was mounted on the stamping.

I felt that this was a much better card than the first one and the right one to send to my cousin.

Using the Starlight silver again, I stamped a sentiment from the Paintbox Poppets stamp set and then cut with a circle spellbinders and mounted on the card to finish.


Tuesday, 29 May 2012

Pink and Blue Parchment

I really liked the way the colours showed through on this card.  This combines the techniques that I like as it includes dorsing, gridwork and cutwork.  It is acutally quite an easy card as there is not much work involved to get the effect. 

The pattern was first pierced using a straight grid.  This ensures uniformity of the pattern which would be extremely hard to achieve using just four hole tools. 

Once the pattern had been pierced, I then coloured the back of the parchment alternating between  Pink and blue Pergamano Dorsa colours.  

I then embossed around the pattern and the straight lines from the box and flower pattern. I embossed a circle at the end of each line from the box pattern using the Star tool and a solid circle at the end of each line from the flower.

Then I cut the crosses in the centre of the box of the pattern and the centre of the flowers with scissors and then cut the long slots and the top, bottom and sides of the box patterns.

I used a piece of pink card as an insert and cut around the edge of the card with shaped scissors to finish.

I have shown a close up of part of the card to show the cutwork in more detail.